
Mudguard Crest Replacement for Modern Piaggio Vespa


Taken from Vespa PE/PX mudguard crest
Note : no need to drill new holes ! reshape only base of the crest !
DIY Customised Lever Handle(s) for Modern Piaggio LX/S/Zip

Original levers shape for Japanese bike (e.g. Yamaha Byson aka FZ 16)
has (slightly) the same shape to Piaggio LX/S/Zip

Modified/reshaped levers for Piaggio LX/S/Zip
The most tricky thing is how to make the shape of the new levers works as the original, otherwise you won't be able to start the engine/motor & the brake light will off !

The result !

This came from Yamaha V-ixion (sloping)


Adjusting ....
Note : remove the brake lights switch before instilling the levers !
Not bad eh ?! lol .. cheap yet awesome ! (never following the main stream)

Note : DIY mixed & matched wind shield & horn cover


Note : sloping rear break lever handle !
I did on my Zips too !


How to paint and rendering a decal on a motorcycle
Based on my experience (may or may not correct)
A. Primary base paint
(starting from bare metal/plates)
1. Apply primary base paint/epoxy (thick mixture) # observed the damages/defects
2. Sanding, gradually with sandpaper e.g. no. 240 - no. 320 *
3. Repair the severe damage with putty
4. Sanding, gradually with sandpaper e.g. no. 240 - no. 320 * as thin as possible
5. Apply primary base paint/epoxy (thick mixture)# as straightening/fill in the subtle defects
6. Sanding, gradually with sandpaper e.g. no. 240 - no. 320 * as thin as possible
7. Apply primary base paint/epoxy (thick mixture) # as straightening/fill in the subtle defects on the certain spots
8. Sanding, gradually with sandpaper e.g. no. 320 - no. 600 *
9. Observe the result. Repeated to its perfection (if needed). Ready for coloring.
B. Coloring light silver
(starting from primary base paint)
(light silver as a basis for candy paint)
1. Apply light silver/1st layer (thick mixture) #
2. Sanding, gradually, slightly thin e.g. no. 800 - no. 1000 *
3. Apply primary base paint/epoxy (thick mixture) # or putty as straightening/fill in the subtle defects on the certain spots (acceptable)
4. Sanding, gradually, slightly thin e.g. no. 800 - no. 1000 *
5. Apply light silver/2nd layer (rather dilute mixture) # assuming there are no defects/is perfect ^
6. Sanding, gradually, slightly thin e.g. no. 800 - no. 1000 *
7. Observe the result. Repeated to its perfection (if needed). Ready for candy paint.
C. Coloring candy paint
(starting from light silver paint as basis for candy paint)
1. Apply candy paint/1st layer (rather dilute mixture) #
2. Sanding, gradually, slightly thin e.g. no. 800 - no. 1000 *
3. Apply candy paint/2nd layer (more dilute mixture) # assuming there are no defects/is perfect ^
4. Sanding, gradually, slightly thin e.g. no. 800 - no. 1000 *
5. Ready for final stage/finishing.
D. Glossy looks with certain spot polishing
(starting from candy paint with the decal has been applied)
(the decal should be covered before applying the last layer of candy paint)
(more difficult and complicated but likely to be implemented)
1. Apply candy paint/3rd/final layer (more dilute mixture) #
2. Sanding, gradually, slightly thin e.g. no. 1000 - no. 1500 * and polishing (only) on the intersection of both layer
3. Finish
E. Glossy looks with clear coat and without polishing
(starting from candy paint with the decal has been applied)
(a lot more easier than section C)
1. Apply clear coat/1st layer (rather dilute mixture) #
2. Sanding, gradually, slightly thin e.g. no. 1000 - no. 1500 *
3. Apply clear coat/2nd layer (more dilute mixture) #
4. Finish
F. Rendering the decal
(starting from finish color e.g. candy paint and clear coat has not been applied)
1. Sanding the allocation area of the decal (black as a base of the white lines)
2. Form the outline of black decal. make sure the proportion and the size of the decal is precise ^^
3. Apply adhesive tape ^^^ by follow the out side shape of the (black) decal
4. Cover up the fuel tank (excl. area to be painted) with non sticky materials (e.g. paper, plastic, etc.)
5. Apply the black color (rather dilute mixture) #
6. Sanding, gradually, slightly thin e.g. no. 800 - no. 1000 *
assuming there are no defects/is perfect ^
7. Form the outline of the white lines decal. make sure the proportion and the size of the decal is precise ^^
8. Apply adhesive tape ^^^ by follow the out side shape of the white lines decal
9. Apply the white color (rather dilute mixture) # by using a proper spray gun (e.g. an airbrush)
10. Repeated to its perfection. straight and smooth lines as result
note :
Persistence sanding is the basic requirement to obtain good result
Impressed thin plates and “thin” sound when tapped is a must
* sandpaper density may vary and not necessarily the same as mentioned above
# mixture is depending on the needs. no definite ratio to be given as a reference
^ unacceptable error, due to the character of candy paint. the thicker the layer, the darker the result
^^ cannot be undo or reshape the decal
^^^ not too sticky, easily to bent/deflected, e.g. negative film tape
each stage should be awaited ’till the paint dry up !
How to paint, decal rendering, restoring vintage, classic, old motorcycle/bike, simple restoration guide for beginners (as i am)
i have no knowledge, i’ll keep on learning
i have no skills, i’ll keep on trying
at least i still have curiosity
How to paint and rendering
Based on my experience (may or may not correct)
Step 1. Primary base paint
(starting from bare metal/plates)
1. Apply a primary base paint/epoxy (thick mixture) # observed the damages/defects
2. Sanding, gradually with sandpaper e.g. no. 240 - no. 320 *
3. Repair the severe damage with putty
4. Sanding, gradually with sandpaper e.g. no. 240 - no. 320 * as thin and even as possible
5. Apply a primary base paint/epoxy (thick mixture)# as straightening/fill in the subtle defects
6. Sanding, gradually with sandpaper e.g. no. 240 - no. 320 * as thin and even as possible
7. Apply a primary base paint/epoxy (thick mixture) # as straightening/fill in the subtle defects on a certain spots
8. Sanding, gradually with sandpaper e.g. no. 320 - no. 600 * as thin and even as possible
9. Observe the result. Repeated to its perfection. Ready for coloring.
Step 2.a. for Solid paint
(starting from primary base paint and assuming the surface is already flat/even)
1. Apply base color e.g. blue/1st layer (thick mixture) #
2. Sanding, gradually, slightly thin e.g. no. 800 - no. 1000 *
3. Apply a primary base paint/epoxy (thick mixture) # or putty (on the certain spots) as straightening/fill in the subtle defects
4. Sanding, gradually, slightly thin e.g. no. 800 - no. 1000 *
5. Apply the blue color/2nd layer (rather dilute mixture) # assuming there are no defects/is perfect
6. Sanding, gradually, slightly thin e.g. no. 800 - no. 1000 *
7. Observe the result. Repeated to its perfection. Ready for finishing (jump to Step 4.b).
Step 2.b. for Candy paint
(starting from primary base paint and assuming the surface is already flat/even)
2.b.1. Light silver (as a basis for candy paint)
1. Apply the light silver/1st layer (thick mixture) #
2. Sanding, gradually, slightly thin e.g. no. 800 - no. 1000 *
3. Apply a primary base paint/epoxy (thick mixture) # or putty as straightening/fill in the subtle defects on the certain spots (acceptable)
4. Sanding, gradually, slightly thin e.g. no. 800 - no. 1000 *
5. Apply the light silver/2nd layer (rather dilute mixture) # assuming there are no defects/is perfect
6. Sanding, gradually, slightly thin e.g. no. 800 - no. 1000 *
7. Observe the result. Repeated to its perfection (if needed).
8. Ready for applying a candy paint
9. Assuming do rendering first before candy paint (jump to Step 3)
10. Cover up the finished decal, then (jump to Step 2.b.2), after that (jump to Step 4.a), finished
2.b.2. Candy paint (starting from light silver paint as basis for candy paint)
1. Apply a candy paint/1st layer (rather dilute mixture) #
2. Sanding, gradually, slightly thin e.g. no. 800 - no. 1000
3. Apply a candy paint/2nd layer (more dilute mixture) # assuming there are no defects
4. Sanding, gradually, slightly thin e.g. no. 800 - no. 1000
5. Ready for final stage/finishing
6. Assuming there is no decal (jump to Step 4.b), finished
Step 3. Rendering the decal
(assuming starting from finish color e.g. candy paint and clear coat has not been applied)
1. Sanding the allocation area of the decal (black as a base of the white lines)
2. Form the outline of black decal. make sure the proportion and the size of the decal is precise ***
3. Apply an adhesive tape **** by follow the out side shape of the (black) decal
4. Cover up the fuel tank (excl. area to be painted) with non sticky materials (e.g. paper, plastic, etc.)
5. Apply the black color (rather dilute mixture) #
6. Sanding, gradually, slightly thin e.g. no. 800 - no. 1000 * assuming there are no defects **
7. Form the outline of the white lines decal, make sure the proportion and size is correct **
8. Apply an adhesive tape **** by following the out side shape of the white lines
9. Apply the white color (rather dilute mixture) # by using a proper spray gun e.g. an airbrush
10. Repeated to its perfection (straight and smooth lines)
Step 4.a. Finishing glossy looks with certain (spot) polishing
(starting from candy paint with the decal has been applied)
(the decal should be covered before applying the last layer of candy paint)
(more difficult and complicated but likely to be implemented)
1. Apply a candy paint/3rd/final layer (more dilute mixture) #
2. Sanding, gradually, slightly thin e.g. no. 1000 - no. 1500 * and polishing (only) on the intersection of both layer
3. Finish
Step 4.b. Finishing glossy looks with clear coat and without polishing
(starting from candy paint with the decal has been applied)
(a lot more easier than Step 4.a)
1. Apply a clear coat/1st layer (rather dilute mixture) #
2. Sanding, gradually, slightly thin e.g. no. 1000 - no. 1500 *
3. Apply a clear coat/2nd layer (more dilute mixture) #
4. Finish
note :
Persistence sanding is the basic requirement to obtain good result
Impressed thin plates and “thin” sound when tapped is a must
* sandpaper density may vary and not necessarily the same as mentioned above
# mixture is depending on the needs. no definite ratio to be given as a reference
** unacceptable error, due to the character of candy paint. the thicker the layer, the darker the result
*** cannot be undo or reshape the decal
**** not too sticky, easily to bent/deflected, e.g. negative film tape, etc.
(my) Spraying technique
I am using small size spray gun (K3) which aim to facilitate the movement, also to ease the fatigue
and i prefer the one with air pressure regulator below the handle (easily to adjust the air pressure while in use).
1. Distance (approximate +/- 30 cm, may vary), depend on
a. mixture
b. air pressure, intense of air pressure for long distance, or in reverse
c. type of surface e.g. rounded, flat, wavy, wide, etc.
d. spraying angle, on which part spraying is intended e.g. corners/joints of the subframe, hidden surface, etc.
2. Air pressure (in scale of 1 − 100 %) : not more than 50 % of its capacity, depend on :
a. mixture
b. spraying angle
c. surface
3. Miscellaneous
a. Protect yourself /safety first, by using a mask to avoid a toxic gas, spray in an open room and use a fan if needed
b. Spraying should be steered clear of the finished area/spray forward
c. For a curved/circle/cylinder surface, air pressure should be regulated into medium (air) pressure,
25% up to 35% (quarter of 100% its capacity)
d. Start from the most difficult/hidden area (spotted area), and (the spray) outlet should be set into round shape/focused rather than overspread
e. Let the surface totally dry, then continue with the rest
f. Do sanding evenly (and do not avoid the hidden/difficult surface).
if there is a shiny (even small or spotted) area means the surface still uneven (these will resulted a wavy, porous looks). repeat the sanding ’till the shiny area were vanished.
g. Repeated to its perfection
h. To prevent the result of being soggy :
h.1. (thick mixture) primary base/paint : hardener : thinner = 100 : up to 20 : up to 30 (approximate)
h.2. Usage of Polyurethane material for primary base, paint, hardener or thinner is better (hard and durable). Some times, mixing of primary base with non PU thinner is allowed for fast dry as result
h.3. Do not spray while it rain, night, or in a dark room, due to polyurethane character of slow dry at room temperature (assuming painting in an open space without proper equipment/DIY)
h.4. Do not dry up direct to the sun light, a warm and windy room it’s sufficient (dry evenly)
h.5. Each layer have to be awaited ’till totally dry
That’s all folks,
and have a nice try
All the ‘story’ above based on my experience, may or may not correct
or at least you may learn from my mistakes
some random examples of my finished/on going products :


not yet finished (below)


see my other finished/on going restoration project :
1975 Honda CB 125 Old Japanese Motorcycle Restoration Project (Candy Ruby Red R4C)
1973 Honda CB 100 mk 1 (Candy Blue Green PB-2C-S)(on going restoration project)
1973 Honda CB 125 (candy blue green PB 2C S) vintage japanese motorcycle restoration project
1973 Honda CB 100 mk 1 Fuel Tank Rendering (Candy Blue Green PB-2C-S)
Honda Paint/Color Codes
1977 Vespa Special 90, PTS, small frame, scooter restoration project
1967 Vespa VBC 150 restoration project
1951 Condor A 580 vintage heritage classic motorcycle restoration project
1973 Honda CB 125 (candy blue green PB 2C S) vintage japanese motorcycle restoration project
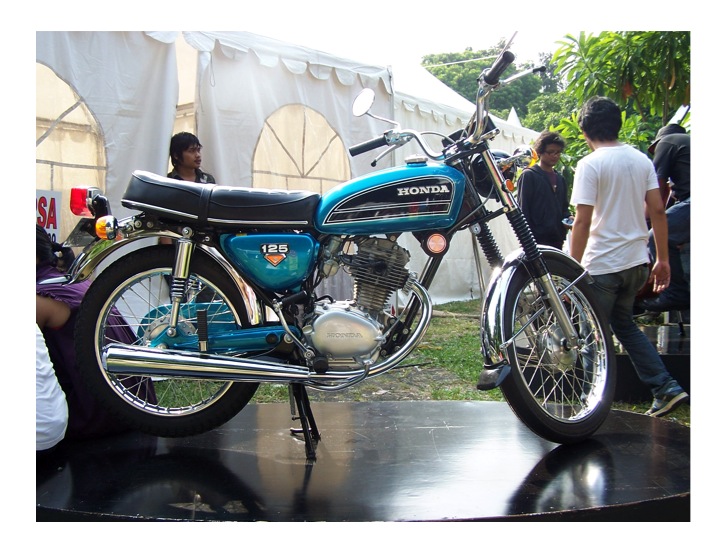

This is my other finished (restored) bike, belongs to my friend.
All the parts are NOS (new old stock)
Restoring is a pleasure for me, no matter the things should be restored, particularly : something that needs to be painted !
Mostly i did to my personal goods for my personal collection
But, in this case : helping a friends are exceptional (Condor A 580 and this CB 125), especially closest friends with the same point of view the way of restoring (other than that : rejected).
see my other finished/on going restoration project :
1975 Honda CB 125 Old Japanese Motorcycle Restoration Project (Candy Ruby Red R4C)
1973 Honda CB 100 mk 1 (Candy Blue Green PB-2C-S)(on going restoration project)
1973 Honda CB 125 (candy blue green PB 2C S) vintage japanese motorcycle restoration project
1973 Honda CB 100 mk 1 Fuel Tank Rendering (Candy Blue Green PB-2C-S)
Honda Paint/Color Codes
1977 Vespa Special 90, PTS, small frame, scooter restoration project
1967 Vespa VBC 150 restoration project
1951 Condor A 580 vintage heritage classic motorcycle restoration project
1951 Condor A 580 vintage heritage classic motorcycle restoration project

This, isn’t my bike ! (if it were mine)
It’s belongs to my friend.
But, i am willing to restore this amazing bike, back to it glory day !
As we have the same point of view to restore the bike : back to original !
Then we split the actions : i’m dealing with the body and he’s dealing with the engine.
This is a ‘rare’ motorcycle (in my point of view), especially within my country (rumor says : there are only 5 units/the A 580 here, but only 3 remains due to ‘canibalism’ for its parts - so pity).
As you see above, the bike is ‘well preserved’ remain unchanged, even for the rifle holder, brace for map on top of the fuel tank, tool box, medical box, etc. The rest, i can’t be described in detail (lack of knowledge/experience) :(


Molded joint frame has rough surfaces, but tend to be smoothed (aging).
Spotted spray of epoxy and paint are to regain the looks.


I like the logo, combined with the shape = awesome

Unique design of the engine case gives smooth looks to the overall bike

Huge brake drums, indicated high power output of the engine displacement.

As always, pays attention to the details

All the material of classic bike to be made for everlasting :)


to be continued ………..
see my other finished/on going restoration project :
1975 Honda CB 125 Old Japanese Motorcycle Restoration Project (Candy Ruby Red R4C)
1973 Honda CB 100 mk 1 (Candy Blue Green PB-2C-S)(on going restoration project)
1973 Honda CB 125 (candy blue green PB 2C S) vintage japanese motorcycle restoration project
1973 Honda CB 100 mk 1 Fuel Tank Rendering (Candy Blue Green PB-2C-S)
Honda Paint/Color Codes
1977 Vespa Special 90, PTS, small frame, scooter restoration project
1967 Vespa VBC 150 restoration project
1951 Condor A 580 vintage heritage classic motorcycle restoration project
1975 Honda CB 125 Old Japanese Motorcycle Restoration Project (Candy Ruby Red R4C)
1973 Honda CB 100 mk 1 (Candy Blue Green PB-2C-S)(on going restoration project)
1973 Honda CB 125 (candy blue green PB 2C S) vintage japanese motorcycle restoration project
1973 Honda CB 100 mk 1 Fuel Tank Rendering (Candy Blue Green PB-2C-S)
Honda Paint/Color Codes
1977 Vespa Special 90, PTS, small frame, scooter restoration project
1967 Vespa VBC 150 restoration project
1951 Condor A 580 vintage heritage classic motorcycle restoration project
Subscribe to:
Posts (Atom)